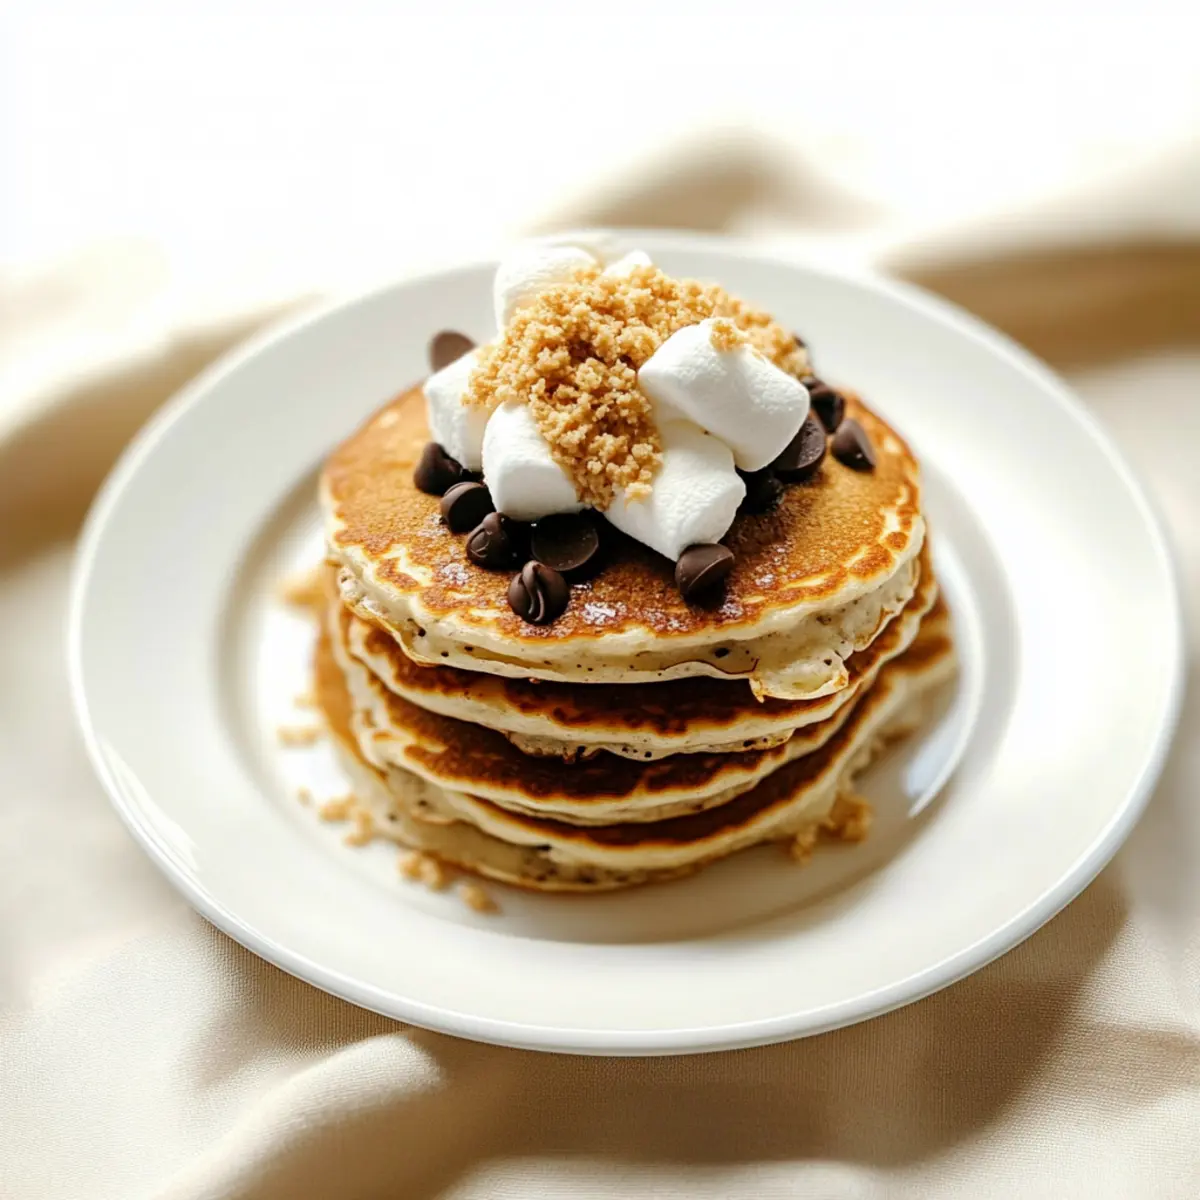
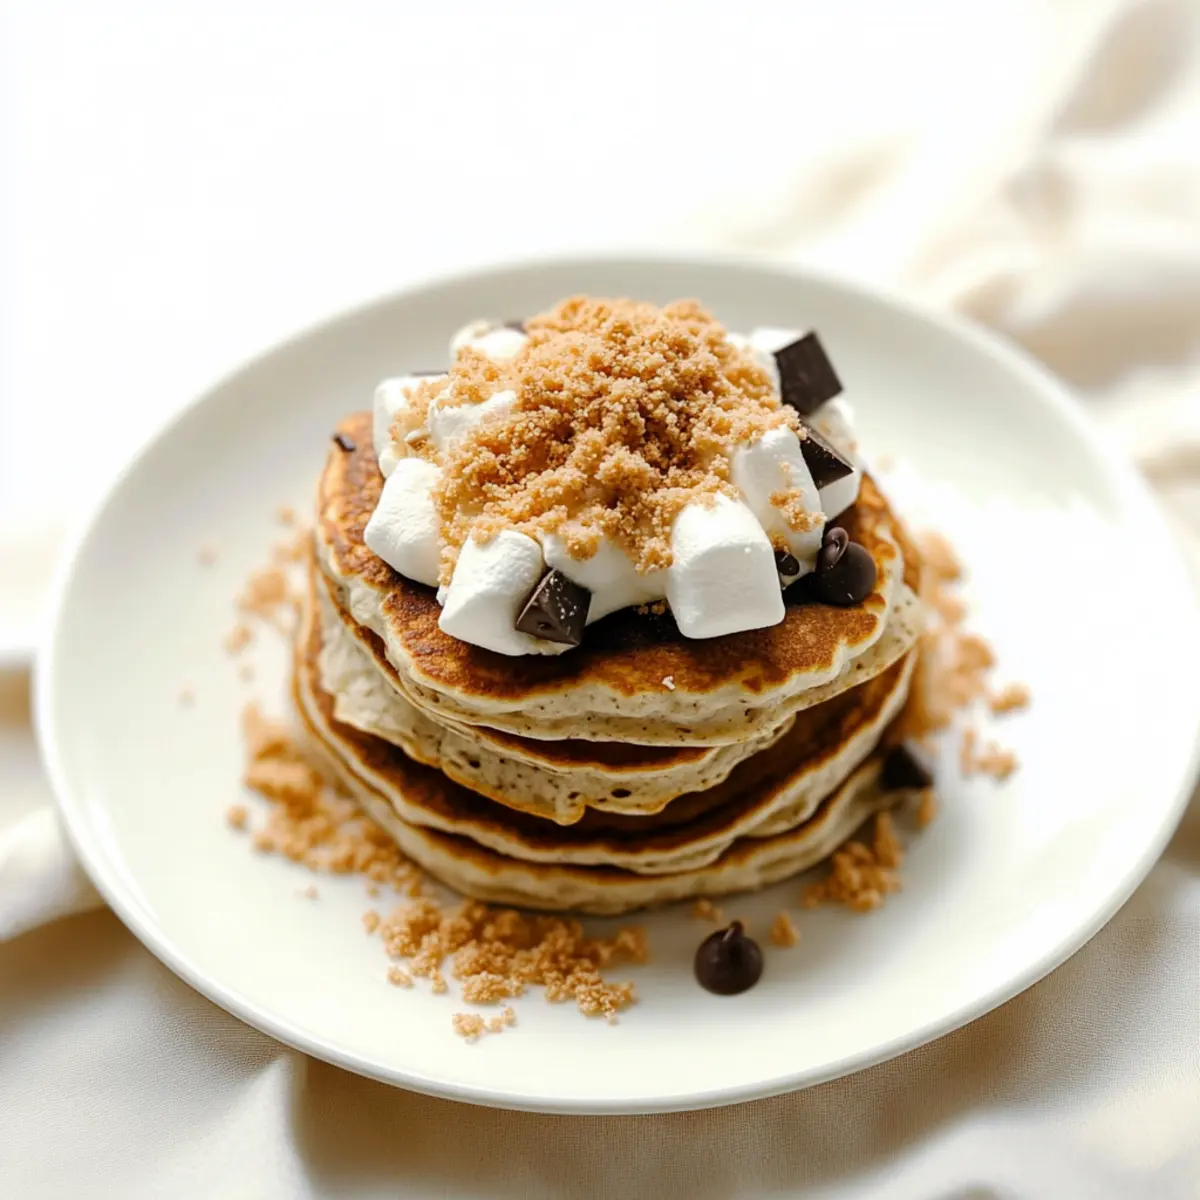
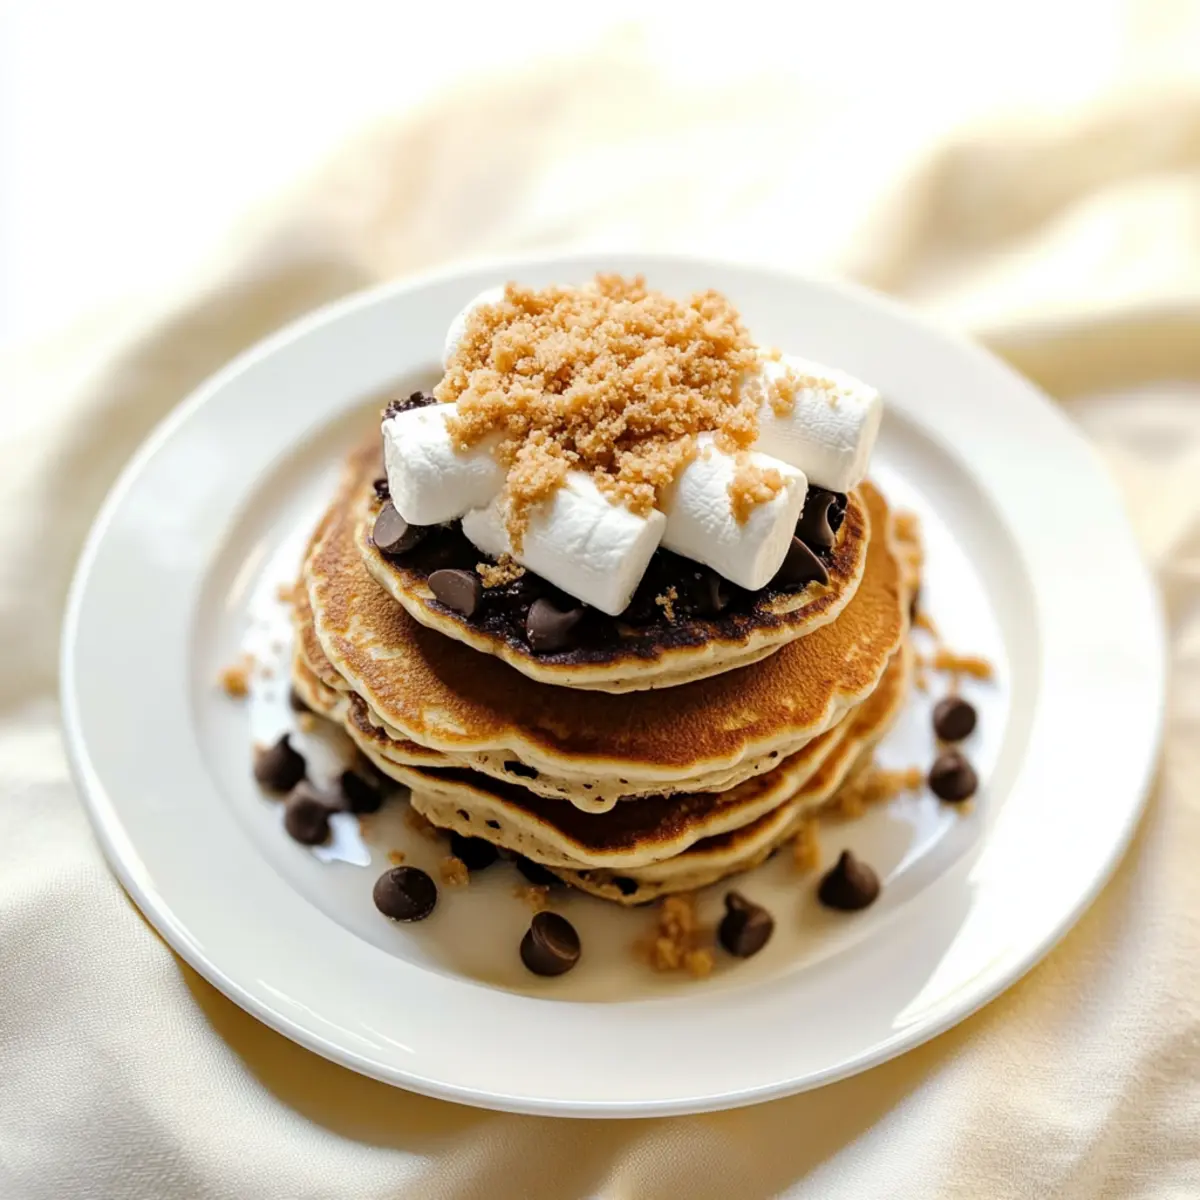
The kitchen fills with the sweet aroma of chocolate that instantly transports me back to summer camping trips, laughter, and s’mores shared around the campfire. These Gluten-Free S’mores Pancakes are my delicious twist on a classic favorite, making it possible to indulge in that nostalgic flavor any day of the week—no flames needed! Quick to whip up and perfectly fluffy, they are a delightful breakfast treat the whole family will adore, whether they’re gluten-sensitive or simply seeking something unique. Imagine starting your morning with rich chocolate and gooey marshmallow goodness—what’s not to love? Ready to dive into this scrumptious recipe? Let’s flip some pancakes!

Why are these pancakes a must-try?
Decadent Flavor: Each bite of these Gluten-Free S’mores Pancakes delivers a delightful combination of rich chocolate and gooey marshmallow that transports you to summer nights filled with joy.
Quick & Easy: These pancakes are ready in just minutes, making breakfast a breeze without sacrificing taste.
Diet-Friendly: Perfect for gluten-free and vegan diets, everyone can dive into this sweet treat worry-free!
Versatile Options: Add your favorite toppings like fresh berries or a drizzle of maple syrup for an extra burst of flavor, or make them dessert-worthy with a scoop of dairy-free ice cream.
Family-Friendly: Kids will love the fun, campfire flavor! Serve them alongside eggs or fruit for a balanced meal that pleases even the pickiest eaters.
These delicious pancakes won’t just satisfy your cravings; they’ll quickly become a go-to recipe in your kitchen. If you’re looking for more s’mores inspiration, check out my Crab Shrimp Stuffed dish for unique flavor combinations!
Gluten-Free S’mores Pancakes Ingredients
• Indulge in the sweetness of breakfast with this delicious recipe!
For the Pancake Batter
- Gluten-Free Flour Blend – Provides structure; switch with a 1:1 gluten-free mix for perfect pancakes.
- Cocoa Powder – Infuses that rich chocolate flavor; opt for unsweetened cocoa for a deeper taste.
- Baking Powder – Essential for fluffiness; make sure it’s gluten-free if needed.
- Baking Soda – Acts as a leavening agent; no substitutions are necessary.
- Salt – Enhances all flavors; use sea salt or kosher salt for best results.
- Plant-Based Milk – Keeps batter moist; almond or oat milk works beautifully as a dairy alternative.
- Maple Syrup or Agave – Adds sweetness and moistness; swap with coconut sugar for a lower glycemic index.
- Vanilla Extract – Boosts flavor; always go for pure vanilla extract for optimal taste.
- Dairy-Free Chocolate Chips – Brings that classic s’mores element; dairy-free carob chips are a good alternative.
- Vegan Marshmallow Fluff – Adds that signature marshmallow taste and texture; consider making your own or buying pre-made.
For Serving
- Extra Dairy-Free Chocolate Chips – Add more on top for an indulgent treat.
- Vegan Marshmallow Fluff – Use generously for that gooey s’mores effect.
Now that you have the Gluten-Free S’mores Pancakes ingredients ready, it’s time to start your pancake journey!
Step‑by‑Step Instructions for Gluten-Free S’mores Pancakes
Step 1: Combine Dry Ingredients
In a large mixing bowl, whisk together the gluten-free flour blend, cocoa powder, baking powder, baking soda, and salt. Ensure everything is well combined, as this mixture forms the base for your Gluten-Free S’mores Pancakes. This step sets the stage for a fluffy pancake, so take a moment to break any clumps and enjoy the rich chocolate aroma.
Step 2: Mix Wet Ingredients
In a separate bowl, whisk together the plant-based milk, maple syrup, and vanilla extract until smooth. This blend will create the perfect moistening agent for the batter. Look for a creamy consistency, and ensure the maple syrup is fully integrated for a balanced sweetness. This delicious mixture will take your pancakes to the next level.
Step 3: Combine Mixtures
Pour the wet ingredients into the bowl with the dry ingredients. Gently fold the mixture until just combined—be careful not to over-mix, as this can lead to denser pancakes. It’s okay if there are a few lumps; they will cook out. Once combined, feel free to share the delightful scents wafting through your kitchen!
Step 4: Add Chocolate Chips
Gently fold in the dairy-free chocolate chips with a spatula, ensuring an even distribution throughout the batter. These little morsels will melt as the pancakes cook, contributing to the gooey s’mores flavour profile. Feel the excitement build as you prepare for the final cooking step with the promise of a delicious breakfast.
Step 5: Prepare the Skillet
Heat a non-stick skillet or griddle over medium heat, allowing it to warm for about 2-3 minutes. Lightly grease the surface with a sprinkle of oil or vegan butter to prevent sticking. Once the skillet is heated, you’ll notice a slight shimmer, indicating it’s ready for your batter. This step is crucial for achieving that perfect golden-brown exterior on your pancakes.
Step 6: Cook the Pancakes
Pour a ladleful of pancake batter onto the heated skillet, depending on your preferred size. Cook for about 2-3 minutes or until bubbles form on the surface and the edges start to look set. This visual cue indicates that it’s time to flip. Your Gluten-Free S’mores Pancakes will soon be ready to take on a beautiful golden hue!
Step 7: Flip and Finish Cooking
Carefully flip the pancake with a spatula and cook for another 2-3 minutes. You’ll know they’re done when they are puffed and lightly browned on both sides. These fluffy delights should look irresistible, inviting you to stack them high on a plate. Repeat this process with the remaining batter, adjusting the heat as necessary to maintain the perfect cooking temperature.
Step 8: Serve and Enjoy
Once all pancakes are cooked, serve them warm with generous dollops of vegan marshmallow fluff and extra chocolate chips on top. This finishing touch brings the classic s’mores experience to your breakfast table. Admire the gooey, decadent presentation of your Gluten-Free S’mores Pancakes—your family will be eager to dive in!
How to Store and Freeze Gluten-Free S’mores Pancakes
Fridge: Keep leftover pancakes in an airtight container for up to 3 days. This helps maintain their soft texture while keeping them fresh for your morning cravings!
Freezer: For longer storage, freeze pancakes in a single layer on a baking sheet, then transfer to an airtight container or freezer bag. They can be stored for up to a month.
Reheating: Reheat pancakes in a toaster or microwave. For microwaving, cover with a damp paper towel and heat for 30–60 seconds until warm to preserve moisture.
Serving Suggestion: Enjoy reheated pancakes topped with extra vegan marshmallow fluff and chocolate chips for a delightful breakfast treat any day of the week!
What to Serve with Gluten-Free S’mores Pancakes
Indulging in these delightful pancakes opens the door to a world of perfect pairings that elevate your breakfast experience.
- Fresh Berries: Juicy strawberries or blueberries add a pop of sweetness and freshness, balancing the rich chocolate flavor beautifully.
- Coconut Yogurt: Creamy and refreshing, coconut yogurt brings a wonderful texture contrast and a hint of tropical flair that complements the pancakes.
- Maple Syrup Drizzle: A little extra drizzle enhances the pancakes’ sweetness, creating a delectable layer of flavor that makes every bite irresistible.
- Whipped Coconut Cream: Light and airy, this luxurious topping mirrors marshmallow fluff and adds a velvety richness to each pancake.
- Crushed Graham Crackers: Sprinkle these on top for that classic s’mores crunch, adding texture and enhancing the overall flavor experience.
- Nut Butter: A spread of almond or peanut butter provides nutty depth and healthy fats, making each bite even more satisfying.
- Iced Coffee or Hot Chocolate: Pairing with your favorite beverage, a tall glass of iced coffee or rich hot chocolate takes breakfast into decadent territory.
Make Ahead Options
These Gluten-Free S’mores Pancakes are perfect for meal prep! You can mix the dry ingredients (gluten-free flour blend, cocoa powder, baking powder, baking soda, and salt) up to 24 hours in advance and store them in an airtight container to maintain freshness. Additionally, prepare the wet mixture (plant-based milk, maple syrup, and vanilla extract) and refrigerate it for up to 3 days. When you’re ready to cook, simply combine the wet and dry ingredients, fold in the dairy-free chocolate chips, and cook as directed. By prepping ahead, you’ll save valuable time on busy mornings while still enjoying fluffy pancakes that taste just as delicious!
Expert Tips for Gluten-Free S’mores Pancakes
-
Ingredient Check: Always verify that all ingredients labeled gluten-free, especially pre-made items like chocolate chips and marshmallow fluff, to avoid accidental gluten exposure.
-
Perfect Fluffiness: Do not over-mix the batter! Mixing until just combined will keep your Gluten-Free S’mores Pancakes light and fluffy, while overmixing can lead to dense pancakes.
-
Right Temperature: Ensure your skillet is at the right temperature before pouring the batter—too hot will burn them, while too cool will make them soggy; aim for medium heat.
-
Add Flavor Layers: For even more s’mores goodness, consider adding crushed graham crackers to the batter and serving with fresh berries alongside your pancakes to enhance flavor and texture.
-
Leftover Magic: Store any leftovers in an airtight container in the refrigerator for up to 3 days. Reheat them in a toaster or microwave for a quick snack or breakfast option!
Gluten-Free S’mores Pancakes Variations
Feel free to get creative and personalize your gluten-free s’mores pancakes to suit your tastes and dietary needs!
-
Graham Cracker Crunch:
Add crushed gluten-free graham crackers into the batter for that classic s’mores crunch. It will enhance the flavor, making each bite reminiscent of campfire nights. -
Coconut Yogurt Twist:
Substitute coconut yogurt for the plant-based milk to create an extra creamy texture. This swap will add a subtle coconut flavor that pairs beautifully with chocolate. -
Fruit Infusion:
Mix in fresh fruit like bananas or strawberries for a natural sweetness and added nutrition. They create delightful pockets of flavor and can elevate your pancakes to a whole new level! -
Nutty Goodness:
Incorporate chopped nuts like walnuts or pecans into the batter for a delightful crunch. This addition adds a boost of healthy fats and protein for a filling meal. -
Spice It Up:
Add a pinch of cinnamon or nutmeg to the dry ingredients for a warm flavor boost. These spices complement the chocolate perfectly, creating a cozy breakfast experience. -
Decadent Chocolate Drizzle:
Create a simple chocolate sauce using melted dairy-free chocolate chips and a splash of plant-based milk. Drizzle it generously over your finished pancakes for an extra sweet treat. -
Dairy-Free Ice Cream Sundae:
Serve your pancakes as a dessert by topping them with a scoop of dairy-free ice cream and a dollop of vegan marshmallow fluff. Transform this breakfast into an indulgent sundae that everyone will love! -
Protein Boost:
Add a scoop of your favorite plant-based protein powder to the batter. This variation is perfect for a filling breakfast that keeps you energized throughout the morning.
For more ideas to inspire your cooking, feel free to check out my Crab Shrimp Stuffed dish, which beautifully combines flavors and textures! Enjoy customizing your pancakes!
Gluten-Free S’mores Pancakes Recipe FAQs
What type of gluten-free flour should I use?
I recommend using a 1:1 gluten-free flour blend suitable for baking. This will provide the structure needed for your pancakes while ensuring they remain fluffy. Look for a blend that includes xanthan gum, as it offers better texture and elasticity.
How should I store leftover pancakes?
Store any leftover Gluten-Free S’mores Pancakes in an airtight container in the refrigerator for up to 3 days. This keeps them fresh and prevents drying out. If you want to make them ahead, they can also be frozen for up to a month!
Can I freeze these pancakes, and how do I do it?
Absolutely! To freeze, allow the pancakes to cool completely. Lay them in a single layer on a baking sheet and freeze until solid. Then, transfer them to an airtight container or a freezer bag, layering parchment paper between pancakes to prevent sticking. They can be stored for up to a month without losing their deliciousness.
What if my pancakes turn out dense?
If your Gluten-Free S’mores Pancakes are dense, it’s likely due to overmixing the batter. Make sure to mix just until combined, leaving a few lumps. Additionally, check that your baking powder is fresh—an expired leavening agent could result in less fluffy pancakes.
Are these pancakes suitable for those with allergies?
Yes! These pancakes are gluten-free and vegan, making them a great choice for many dietary restrictions. However, always double-check your ingredient labels, especially for items like chocolate chips and marshmallow fluff, to ensure they are free from dairy, nuts, or other allergens you may need to avoid.
Can I substitute the plant-based milk?
Of course! While almond or oat milk works beautifully, you can substitute with other plant-based options like soy milk or coconut milk. Just keep in mind that different milks might slightly alter the flavor and texture of your pancakes, but they’ll still be delicious!
Gluten-Free S'mores Pancakes: A Delicious Morning Indulgence
Ingredients
Equipment
Method
- In a large mixing bowl, whisk together the gluten-free flour blend, cocoa powder, baking powder, baking soda, and salt.
- In a separate bowl, whisk together the plant-based milk, maple syrup, and vanilla extract until smooth.
- Pour the wet ingredients into the bowl with the dry ingredients and gently fold until just combined.
- Gently fold in the dairy-free chocolate chips with a spatula, ensuring even distribution.
- Heat a non-stick skillet or griddle over medium heat, lightly greasing with oil or vegan butter.
- Pour a ladleful of pancake batter onto the heated skillet, cooking for 2-3 minutes until bubbles form.
- Carefully flip the pancake and cook for another 2-3 minutes until puffed and lightly browned.
- Serve pancakes warm with generous dollops of vegan marshmallow fluff and extra chocolate chips on top.
Leave a Reply