The moment I bit into a warm, crispy ball of sweetness, it was as if the carnival had come to my kitchen. These Crispy Cotton Candy Cheesecake Bombs are not just a dessert; they’re a playful twist on classic flavors that create pure joy with every bite. Combining a creamy cheesecake filling with a delightful cotton candy crunch, they’re incredibly quick to make and sure to be a hit with your family and friends. Whether you’re whipping these up for a special occasion or a casual get-together, their fun presentation and unique taste will leave everyone wanting more. Ready to impress your loved ones and bring a little magic to your cooking? Let’s dive into this delicious recipe!

Why Are These Dessert Bombs So Irresistible?
Irresistible Flavor: The combination of creamy cheesecake and sweet cotton candy creates an explosion of fun flavors that everyone loves.
Quick & Easy: With minimal prep time, these bombs are perfect for last-minute parties or family gatherings, making you the star in any kitchen!
Family Appeal: Kids and adults alike will delight in their unique flavors and fun textures, making them a hit at any event.
Versatile Treat: Experiment with different cotton candy flavors or shapes for a customized dessert experience, similar to the versatility in my Honey Garlic Chicken recipe.
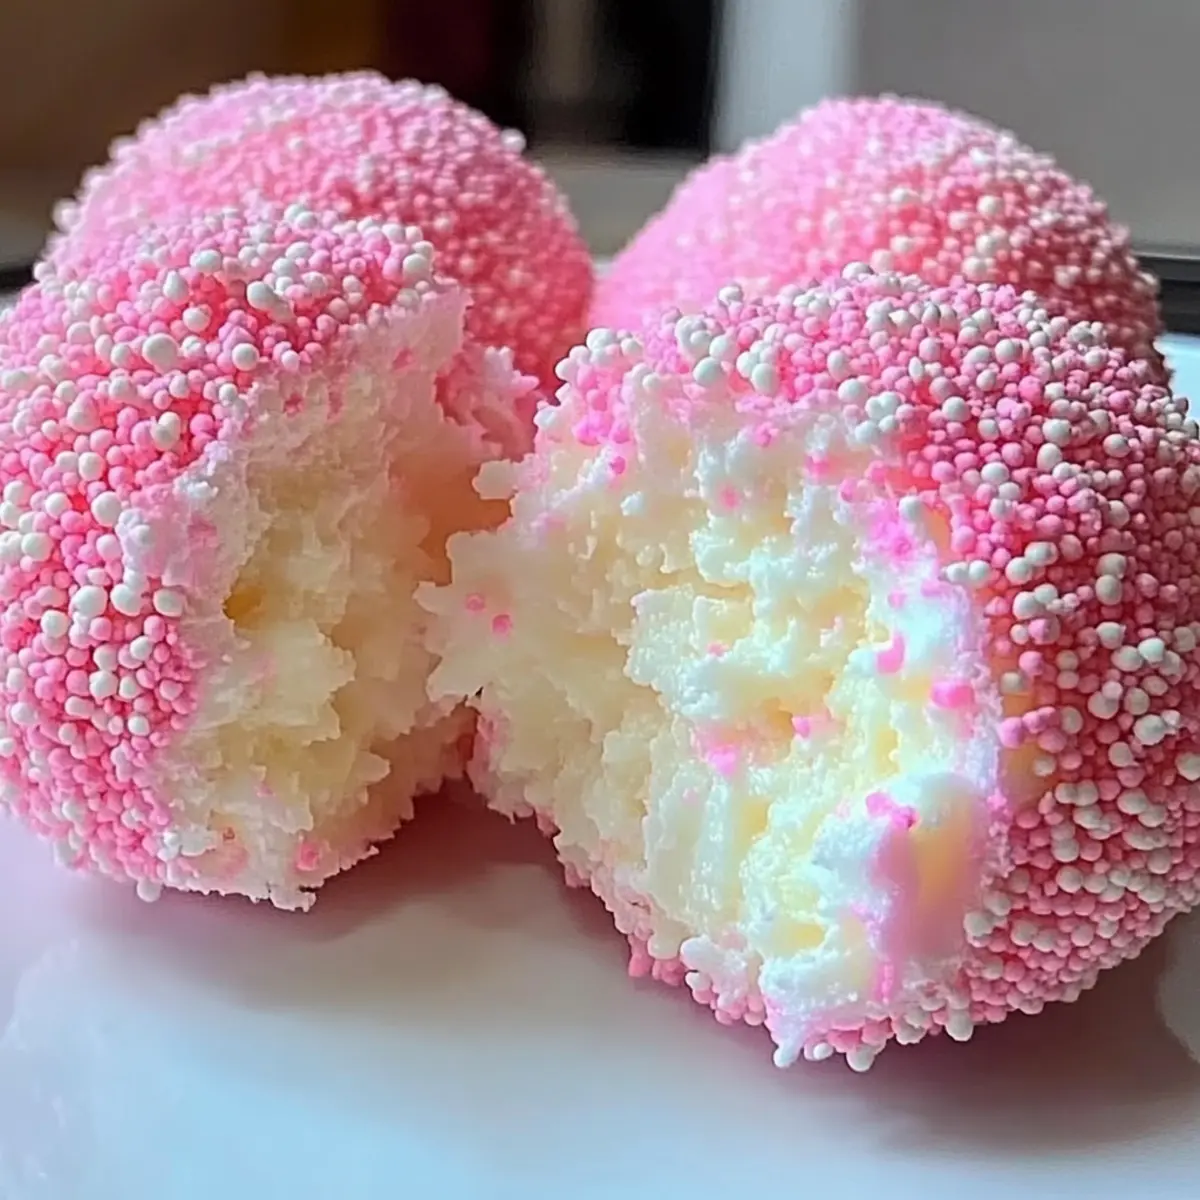
Crispy Delight: Each bomb boasts a golden, crunchy exterior that gives way to a soft filling, creating a delightful contrast that will keep everyone coming back for seconds.
Make-Ahead Convenience: Store leftovers for up to three days – if they last that long! They’re just as delicious reheated, so you can enjoy the magic long after the party.
Crispy Cotton Candy Cheesecake Bombs Ingredients
Get ready to bring some sweet magic to your kitchen with these Crispy Cotton Candy Cheesecake Bombs!
For the Filling
- Cream Cheese – Provides creaminess and richness to the filling. Use Neufchâtel for a lower-fat option.
- Granulated Sugar – Adds sweetness to the filling. Can substitute with sweetener for a reduced-sugar version.
- Vanilla Extract – Enhances the overall flavor. Use pure vanilla for the best taste; imitation vanilla as a budget option.
- Cotton Candy (crushed) – Key flavor ingredient, adds sweetness and texture. Any flavor can be used for variation.
For the Dough
- Graham Cracker Crumbs – Forms the outer dough, giving structure and a hint of sweetness. Can replace with digestive biscuits or gluten-free crumbs.
- All-Purpose Flour – Provides structure and stability. Whole wheat flour can be used for a nuttier flavor.
- Baking Powder – Helps the dough rise slightly. Ensure it’s fresh for optimal results.
- Salt – Balances sweetness and enhances flavors. Reduce or omit for low-sodium versions.
- Eggs – Binds the dough and provides richness. Flax eggs can be used as a vegan substitute.
For the Coating
- Cotton Candy-Flavored Candy Melts – For coating, adds visual appeal and flavor. Can use chocolate or white chocolate melts as alternatives.
- Oil for Frying – Necessary for cooking; vegetable or canola oil recommended.
These Crispy Cotton Candy Cheesecake Bombs will transform your dessert game and bring smiles all around!
Step‑by‑Step Instructions for Crispy Cotton Candy Cheesecake Bombs
Step 1: Prepare Filling
In a mixing bowl, blend together the cream cheese, granulated sugar, vanilla extract, and crushed cotton candy using an electric mixer until smooth and creamy, about 2-3 minutes. Once well combined, cover the bowl with plastic wrap and refrigerate for 30 minutes to allow the flavors to meld and the mixture to firm up.
Step 2: Make Dough
In a separate large bowl, mix the graham cracker crumbs, all-purpose flour, baking powder, and salt until evenly distributed. Add in the beaten eggs and stir until a dough forms, resembling a thick batter. The dough should be pliable and slightly sticky, perfect for encasing the creamy filling of the Crispy Cotton Candy Cheesecake Bombs.
Step 3: Shape Bombs
Once the filling is chilled, take a small portion of the dough and flatten it in your palm. Place a spoonful of the chilled cream cheese mixture in the center and carefully fold the dough around it, sealing it tightly into a ball. Make sure there are no gaps or cracks to prevent the filling from leaking during frying. Repeat this process with the remaining dough and filling.
Step 4: Chill Again
Place the formed bombs onto a parchment-lined baking sheet and transfer them to the freezer for 15 minutes. This step helps firm up the bombs, making them easier to fry and ensuring they hold their shape during cooking. You want them to be slightly frozen but not hard; this will ensure perfect frying results.
Step 5: Fry
In a large pot or deep skillet, heat vegetable or canola oil to 350°F (175°C). Carefully add the chilled cheesecake bombs in batches, frying them for 2-3 minutes or until they turn golden brown. Use a slotted spoon to gently turn them for even cooking, then remove and let them drain on paper towels, allowing excess oil to soak away.
Step 6: Coat with Candy Melts
Melt the cotton candy-flavored candy melts in a microwave-safe bowl according to package instructions until smooth and glossy. Dip each fried bomb into the melted candy, ensuring it is fully coated. Before the coating sets, sprinkle additional crushed cotton candy over the top for an extra layer of sweetness and visual appeal.
Step 7: Serve
Allow the candy coating to set for a few minutes at room temperature before serving your Crispy Cotton Candy Cheesecake Bombs. Enjoy them warm for the best texture, and watch as everyone revels in this delightful dessert that combines fun flavors with a nostalgic twist!
How to Store and Freeze Crispy Cotton Candy Cheesecake Bombs
-
Room Temperature: Best enjoyed fresh, but you can keep the bombs at room temperature for up to 2 hours if serving at a party.
-
Fridge: Place any leftovers in an airtight container and refrigerate for up to 3 days. Reheat briefly to restore crispiness.
-
Freezer: For longer storage, freeze the uncooked bombs on a baking sheet until firm, then transfer to a zip-top bag for up to 1 month. Fry from frozen without thawing!
-
Reheating: To reheat, place leftovers in the oven at 350°F (175°C) for about 5-7 minutes until warm and crispy. Enjoy the magical flavors of these Crispy Cotton Candy Cheesecake Bombs!
Make Ahead Options
These Crispy Cotton Candy Cheesecake Bombs are ideal for busy home cooks looking to save time without compromising on flavor! You can prepare the filling and dough up to 24 hours in advance, storing them separately in airtight containers in the refrigerator. Simply form the bombs and freeze them as directed, ensuring they are slightly firm before frying. When you’re ready to serve, fry the bombs just before guests arrive to enjoy that fresh, crispy texture. For leftovers, store in the refrigerator for up to 3 days, and reheat in the oven to maintain their delightful crispness. This way, you can indulge in these sweet creations with minimal last-minute effort!
What to Serve with Crispy Cotton Candy Cheesecake Bombs
Indulging in these delightful treats opens up a world of exciting flavor combinations, elevating your dessert experience.
-
Vanilla Ice Cream: A scoop of rich, creamy vanilla ice cream complements the crunchy exterior, balancing the sweetness of each bomb.
-
Fresh Berries: Juicy strawberries or blueberries offer a refreshing contrast and vibrant color, making each bite feel even more special.
-
Chocolate Sauce: Drizzling warm chocolate sauce over the bombs adds an extra layer of decadence, enhancing the overall treat and delightful squish.
-
Whipped Cream: Light and airy, a dollop of whipped cream rounds out the dessert perfectly, providing a fluffy contrast to the crispy exterior.
-
Cotton Candy Fluff: Serve alongside a cloud of cotton candy for a whimsical presentation that echoes the flavor profile of the bombs.
-
Sparkling Water: A chilled glass of sparkling water with lime adds a refreshing zest, cleansing the palate between these sweet bites.
-
Lemon Sorbet: The bright citrus flavor of lemon sorbet cuts through the richness and offers a delightful contrast, awakening your tastebuds.
Enjoy your Crispy Cotton Candy Cheesecake Bombs with these wonderfully complementary options for a truly magical culinary experience!
Crispy Cotton Candy Cheesecake Bombs Variations
Feel free to sprinkle your own magic on these delicious dessert bombs with creative twists that will elevate your treat!
-
Fruit-Infused: Incorporate a spoonful of fruit preserves or puree into the cheesecake filling for a fruity burst of flavor. Raspberry or strawberry work beautifully!
-
Nutty Delight: Add crushed nuts, like walnuts or almonds, to the dough for an added crunch and flavor contrast. The nuts not only elevate the texture but also create a lovely contrast with the creamy filling.
-
Chocolate Drizzle: Instead of candy melts, drizzle melted dark or white chocolate over the tops. This indulgent twist pairs perfectly with the sweetness of cotton candy for a richer flavor experience.
-
Spiced Version: Add a dash of cinnamon or nutmeg to the graham cracker mixture for a warm, spiced flavor. It gives a fun seasonal twist that can remind you of cozy fall gatherings.
-
Savory Twist: Experiment by mixing in a hint of cream cheese with a sprinkle of savory herbs for a delightful contrast to your cotton candy. It could offer a fun, unexpected flavor that intrigues the palate!
-
S’mores Style: Substitute graham cracker crumbs with crushed chocolate cookies and stuff the bombs with pieces of chocolate and mini marshmallows for a tempting s’mores flavor.
-
Cotton Candy Variety: Experiment with different cotton candy flavors (like blue raspberry or watermelon) for unique explosions of sweetness that can keep the dessert fresh and exciting.
Each of these variations can transform your Crispy Cotton Candy Cheesecake Bombs into something truly unique and personal. Want more culinary inspiration? These twists remind me of the delightful flavors in my Crispy Chicken Wonton Tacos or the sweet crunch of Honey Garlic Chicken. Happy cooking!
Expert Tips for Crispy Cotton Candy Cheesecake Bombs
-
Chill the Filling: Always chill the cream cheese filling properly before assembling. A colder filling makes it easier to handle and reduces the chance of leakage.
-
Seal Tight: Be sure to seal the dough around the filling tightly to avoid any mishaps during frying. Gaps may cause the filling to ooze out!
-
Monitor Oil Temp: Keep an eye on the oil temperature with a thermometer. Frying at 350°F (175°C) ensures that the Crispy Cotton Candy Cheesecake Bombs turn golden without absorbing too much oil.
-
Batch Frying: Frying in small batches helps maintain the oil temperature, resulting in that perfect crispy texture. Don’t overcrowd the pot!
-
Use Quality Ingredients: Invest in high-quality cotton candy and vanilla extract for the best flavor. It really enhances the overall taste of these delightful treats!
-
Serve Fresh: While leftovers can be stored, Crispy Cotton Candy Cheesecake Bombs are best enjoyed fresh and warm. Reheat briefly in the oven for that crispy outer layer.

Crispy Cotton Candy Cheesecake Bombs Recipe FAQs
What type of cotton candy works best for this recipe?
Absolutely! Any flavor of cotton candy can be used, but I recommend trying classic flavors like pink vanilla or blue raspberry for a fun look and taste. The sweeter and fluffier the cotton candy, the better your cheesecake bombs will taste!
How should I store leftover cheesecake bombs?
Store any leftover Crispy Cotton Candy Cheesecake Bombs in an airtight container in the refrigerator for up to 3 days. To maintain their delicious texture, I suggest reheating them briefly in the oven to regain that crispy exterior.
Can I freeze the cheesecake bombs, and how?
Yes, you can freeze these delightful treats! After shaping the bombs but before frying, place them on a baking sheet and freeze until firm. Then transfer them to a zip-top bag and freeze for up to 1 month. When ready to fry, simply cook them from frozen without thawing, adding an extra minute or two to the frying time.
What if my filling leaks during frying?
Don’t fret; it happens! To avoid filling leaks, make sure to seal the dough tightly around the filling. If you find that any bombs are leaking, try freezing them a bit longer before frying. Remember, frying in small batches and maintaining the oil temperature at 350°F (175°C) can also help create the perfect crispy shell.
Are these cheesecake bombs suitable for vegetarians or vegans?
While traditional versions use eggs and cream cheese, you can make these Crispy Cotton Candy Cheesecake Bombs vegetarian-friendly by substituting flax eggs in place of regular eggs. For a vegan twist, use dairy-free cream cheese and plant-based oil for frying. You can also replace regular candy melts with vegan alternatives!
How can I make these cheesecake bombs gluten-free?
Absolutely! To make gluten-free Crispy Cotton Candy Cheesecake Bombs, substitute the graham cracker crumbs with gluten-free crumbs and use a gluten-free all-purpose flour blend in the dough. Just ensure that all other ingredients are certified gluten-free to keep everything safe and delicious!

Crispy Cotton Candy Cheesecake Bombs for Sweet Celebrations
Ingredients
Equipment
Method
- In a mixing bowl, blend together the cream cheese, granulated sugar, vanilla extract, and crushed cotton candy using an electric mixer until smooth and creamy, about 2-3 minutes. Cover and refrigerate for 30 minutes.
- In a separate large bowl, mix the graham cracker crumbs, all-purpose flour, baking powder, and salt. Add beaten eggs and stir until a dough forms.
- Take a small portion of the dough and flatten it in your palm. Place a spoonful of chilled cream cheese mixture in the center and fold the dough around it, sealing tightly.
- Place the formed bombs onto a parchment-lined baking sheet and freeze for 15 minutes.
- In a large pot, heat vegetable or canola oil to 350°F (175°C). Carefully add the cheesecake bombs in batches and fry for 2-3 minutes until golden brown.
- Melt the cotton candy-flavored candy melts until smooth. Dip each fried bomb into the melted candy and sprinkle additional crushed cotton candy on top.
- Allow the candy coating to set for a few minutes at room temperature before serving warm.
Leave a Reply