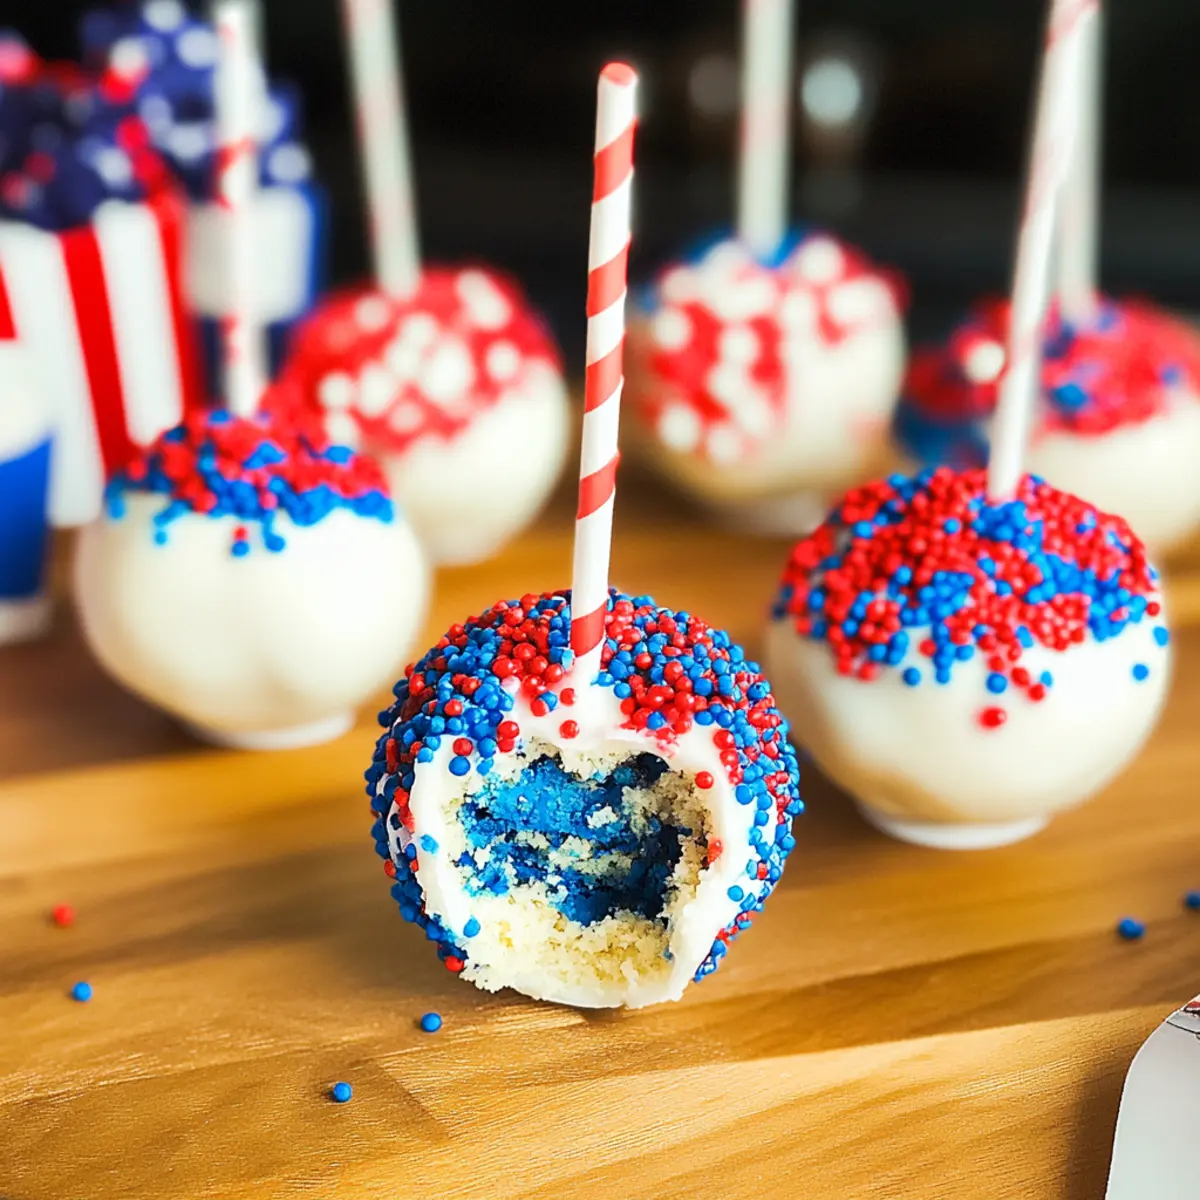
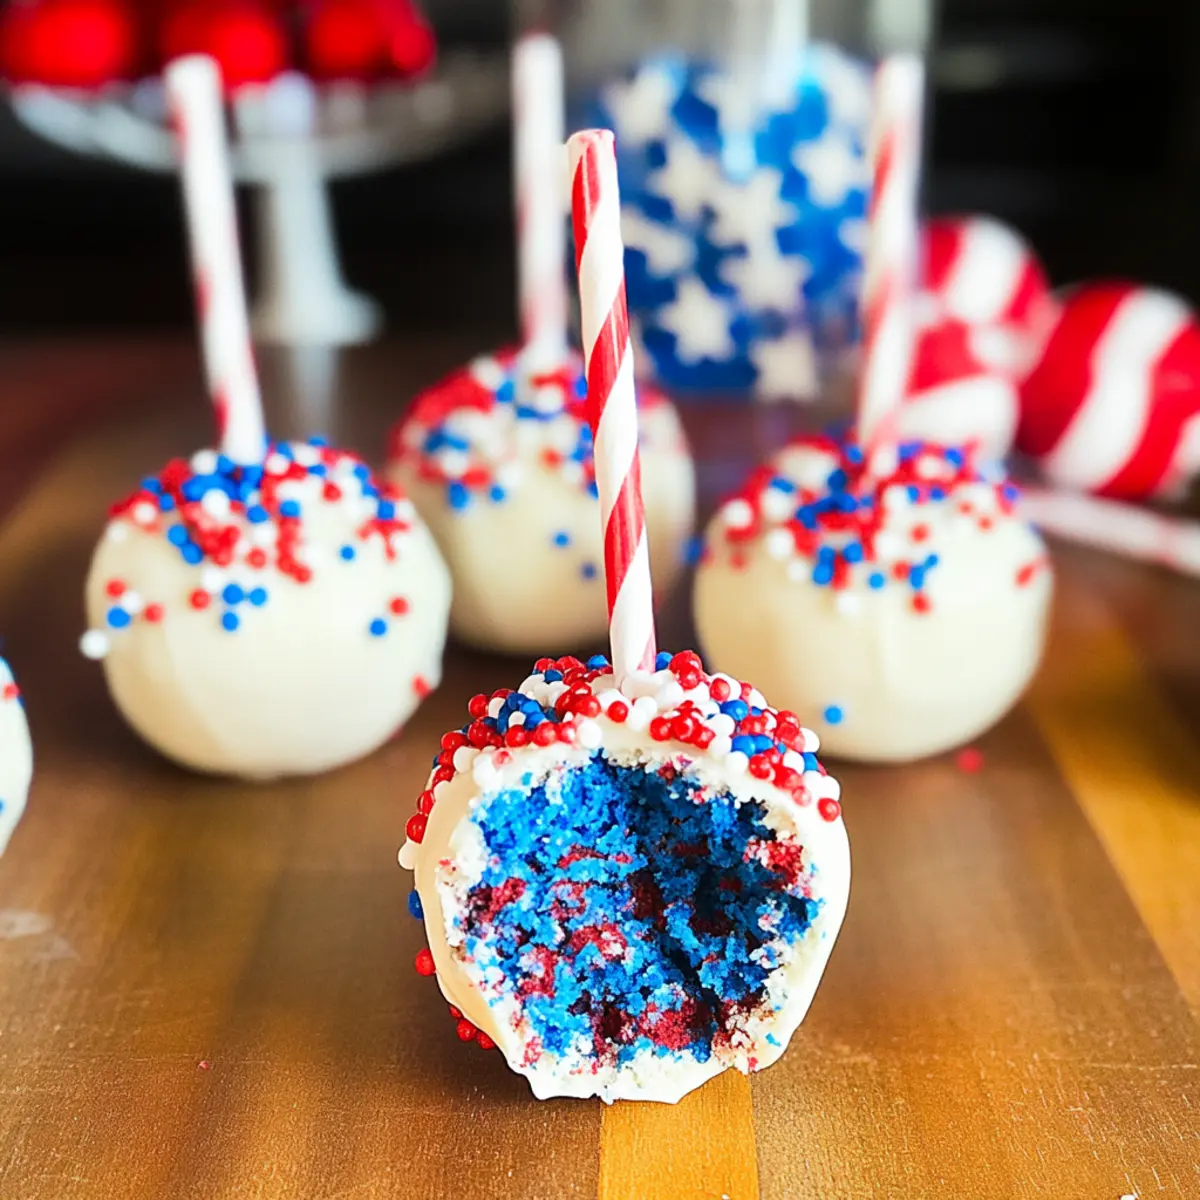
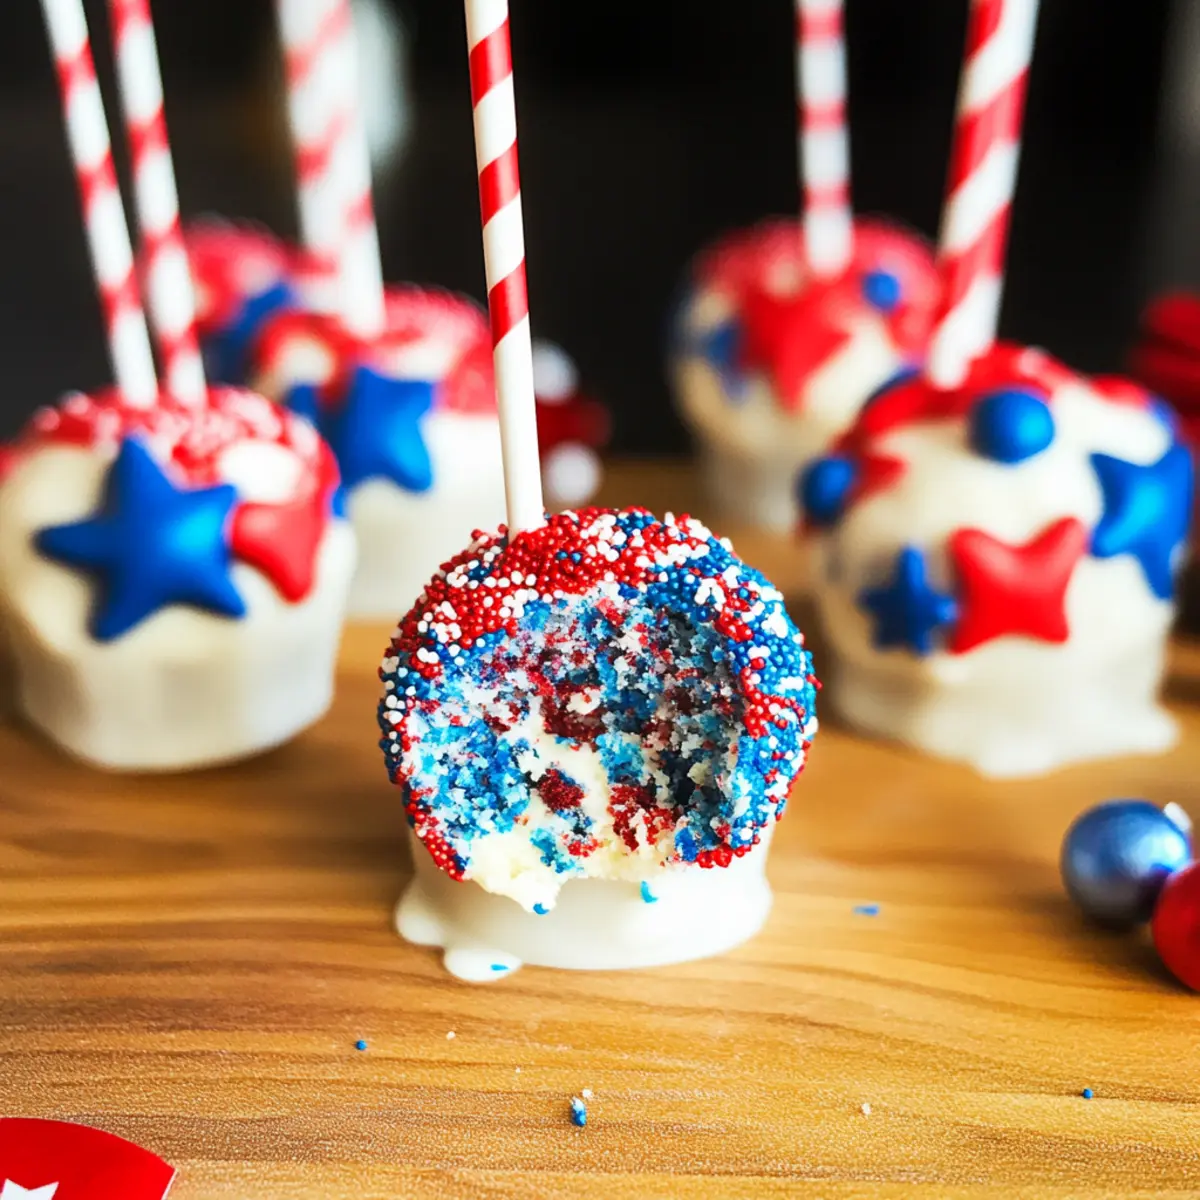
As fireworks light up the sky this Fourth of July, you’re going to want a sweet treat that matches the festive spirit! Enter my Red, White & Blue Cake Pops, a fun and colorful dessert that will leave your guests smiling. What makes these cake pops stand out, besides their eye-catching hues, is the use of Greek yogurt, which adds moisture without any eggs or oil. Not only is this recipe egg-free and oil-free, but it’s also a breeze to whip up—perfect for busy summer celebrations! Each bite delivers a delightful crunch from the candy coating and the soft, moist interior, making them an instant crowd-pleaser. Ready to impress your friends and family with a festive treat? Let’s dive into how you can make these delicious cake pops!
Why Are These Cake Pops Special?
Moist and Flavorful: The secret to their deliciousness lies in the Greek yogurt, providing unbeatable moisture and richness without the need for eggs or oil.
Eye-Catching Presentation: With their vibrant red, white, and blue layers, these cake pops not only taste great but also look stunning, making them a standout at any summer gathering.
Quick and Easy: Made using a simple cake mix and just a few additional ingredients, these cake pops are a breeze to prepare, saving you time for all the fun festivities!
Versatile Treat: Customize them for any celebration; whether it’s the Fourth of July or a birthday bash, you can easily switch up the colors and flavors to match your occasion.
Kid-Friendly Fun: Kids will love helping to make these fun treats—the perfect project for family bonding. Serve them as part of a dessert table along with other favorites like Strawberry Custard Cake or White Chocolate Orange for added variety.
Red, White & Blue Cake Pops Ingredients
Quick note: Gather these ingredients to make your festive Red, White & Blue Cake Pops!
For the Cake Pops
• White Cake Mix – Provides the structure and sweetness for the cake pops; it can be substituted with a homemade cake base if you prefer.
• Plain Greek Yogurt – Adds moisture and richness without the need for eggs or oil; can be replaced with unsweetened applesauce for a dairy-free version.
• Water – Used to mix with the cake mix and yogurt for the perfect batter consistency; no substitution needed.
For the Coating
• White Candy Melts – Acts as the coating for the cake pops, providing a sweet outer layer; substitute with dark chocolate or colored candy melts for a different flavor.
• Vegetable Shortening – Aids in achieving a smooth melting process for the candy coating; can be omitted for a healthier version.
For the Decoration
• Food Coloring (Red & Blue) – Necessary for creating the vibrant festive layers; use gel food coloring for more intense colors.
• Red, White & Blue Sprinkles – Adds a fun crunch and visual appeal; optional, but can be substituted with other sprinkles based on your theme.
Step‑by‑Step Instructions for Red, White & Blue Cake Pops
Step 1: Preheat and Prepare
Begin by preheating your oven to 350°F (175°C). In a large mixing bowl, combine the white cake mix, plain Greek yogurt, and water. Stir until the mixture forms a sticky batter that is well-blended and free of lumps. Grease your baking pans with a light coating of cooking spray, ensuring they’re ready for the vibrant cake layers.
Step 2: Tint the Batter
Once the batter is ready, divide it evenly into three separate bowls. Use red food coloring to tint one bowl, blue food coloring for the second, and leave the third bowl uncolored to maintain a white layer. Mix each bowl thoroughly until the colors are vibrant and uniform, creating the exciting red, white, and blue layers for your Red, White & Blue Cake Pops.
Step 3: Bake the Cake Layers
Pour the colored batters into the prepared baking pans, layering them in that festive order. Bake in your preheated oven for 12-15 minutes, or until a toothpick inserted in the center comes out clean. Once your cakes are baked to perfection, remove them from the oven and let them cool completely in the pans before transferring to a wire rack.
Step 4: Crumble the Cakes
Once the cakes are completely cool, crumble them into a large mixing bowl. Use your hands to break the cakes into small pieces, ensuring no pieces are larger than half an inch. This step is crucial to ensure each cake pop has a consistent texture. Mix thoroughly to combine the colors and create a uniform blend for forming the cake pops.
Step 5: Form the Cake Balls
Using your hands, scoop out about 1-2 tablespoons of the crumbled cake mixture and form them into smooth balls. Repeat until all the mixture is shaped into balls, making sure they are tightly packed to avoid falling apart. Insert a straw or lollipop stick into each ball and lay them on a baking tray lined with parchment paper. Chill in the refrigerator for about one hour to allow them to firm up.
Step 6: Melt the Candy Coating
In a microwave-safe bowl, combine the white candy melts and a tablespoon of vegetable shortening. Heat in the microwave in short 30-second intervals, stirring in between, until the mixture is completely smooth and melted. Make sure not to overheat to avoid burning the candy. This will create a beautiful coating for your Red, White & Blue Cake Pops.
Step 7: Dip and Decorate
Once the cake balls are chilled and firm, dip each one into the melted candy coating, making sure they are fully covered. Allow any excess coating to drip off, creating a smooth finish. Immediately sprinkle red, white, and blue sprinkles over each coated cake pop for festive flair. Place them back on the parchment-lined tray to set.
Step 8: Let Them Set
Let the coated cake pops cool completely until the candy shell hardens, which should take about 30 minutes. Once set, carefully remove the cake pops from the tray and store them in an airtight container in the refrigerator until you’re ready to serve. This will keep them fresh and delicious for your holiday celebrations.
Storage Tips for Red, White & Blue Cake Pops
Fridge: Store your Red, White & Blue Cake Pops in an airtight container in the fridge for up to one week. This helps maintain their freshness and festive look.
Freezer: For longer storage, you can freeze the uncoated cake balls! Place them on a baking sheet to freeze for 1-2 hours, then transfer to a zip-lock bag for up to three months.
Reheating: If frozen, remove your cake pops and dip them in melted candy when you’re ready to serve. There’s no need to defrost—just coat them directly from the freezer for a delightful treat!
Wrapping: For extra protection, you can wrap individual cake pops in plastic wrap before storing them. This will help keep their moisture and flavor intact!
Expert Tips for Red, White & Blue Cake Pops
Chill Time: Ensure you chill the cake balls for at least an hour before dipping. This helps them maintain their shape and prevents melting when coated.
Mixing Consistency: Combine the cake mix, Greek yogurt, and water thoroughly to avoid lumps. A smooth batter ensures even baking and the best texture for your cake pops.
Candy Melting: Be sure to melt the candy melts slowly in short intervals, stirring frequently. This prevents burning and keeps your candy coating smooth and glossy for these delightful Red, White & Blue Cake Pops.
Layering Colors: When pouring batter into the pans, use a spatula to create neat layers. This helps ensure your cake pops have clearly defined red, white, and blue sections.
Sprinkle While Wet: Sprinkle the red, white, and blue decorations immediately after dipping the cake pops. This allows them to stick well and look festive!
Red, White & Blue Cake Pops Variations
Feel free to add your personal touch to these festive cake pops and make them even more delightful!
- Dairy-Free: Replace Greek yogurt with unsweetened applesauce for a lighter, dairy-free alternative that’s still packed with moisture.
- Gluten-Free: Use a gluten-free cake mix to accommodate guests with gluten sensitivities without sacrificing taste.
- Flavored Cake Mix: Experiment with unique flavors like chocolate or lemon cake mixes to create a refreshing twist.
- Varied Coatings: Try dark chocolate or colored candy melts instead of white; each option adds a unique flavor profile
and new layer of excitement for your taste buds! - Infused Sprinkles: Use themed sprinkles for different occasions, like pastel sprinkles for Easter or orange and black for Halloween.
- Layered Cake Pops: Create a multi-layer effect by alternating colors when forming the cake balls—delightful surprises await with each bite!
- Spiced Version: Add a pinch of cinnamon to the cake batter for an autumn-inspired cake pop this coming fall!
- Cream Cheese Filling: For a surprise filling, add a small dollop of cream cheese in the center of the balls before coating. It pairs wonderfully with the sweetness of the cake.
Whatever variation you choose, your guests will adore these delightful treats! Consider pairing them with a refreshing Cinnamon German Pancake for brunch or a festive dessert table alongside Japanese Cotton Cheesecake that will keep those smiles coming!
Make Ahead Options
These Red, White & Blue Cake Pops are perfect for meal prep, allowing you to enjoy the fun of baking without the last-minute rush! You can prepare the cake layers up to 3 days in advance by baking them, cooling completely, and then crumbling the cake into a bowl. Just store the crumbled mix in an airtight container in the refrigerator to maintain freshness. When you’re ready to finish the cake pops, simply form the balls and chill them for an hour before dipping in the melted candy coating. By prepping ahead, you’ll save valuable time while still delivering a deliciously festive treat that’s just as delightful!
What to Serve with Red, White & Blue Cake Pops?
As you gather to celebrate, elevate your festive atmosphere with delightful accompaniments that perfectly balance these whimsical cake pops!
- Rainbow Fruit Salad: A refreshing mix of vibrant berries, kiwi, and melon that adds a crunchy, sweet contrast to the soft cake pops.
- Patriotic Punch: A sparkling, fruity beverage with red strawberries, blue blueberries, and a splash of lemon-lime soda; it’s a thirst-quencher that matches the festive theme beautifully.
- Classic Vanilla Ice Cream: Creamy and cool, this simple yet delightful treat pairs perfectly with the sweetness of the cake pops for a nostalgic dessert experience.
- Chocolate Dipped Pretzels: Sweet and salty, these crunchy snacks add a fun twist to the party and are perfect for munching alongside the cake pops.
- Mini Cheesecakes: Serve individual cheesecake bites that are smooth and rich, offering a decadent alternative for those who seek a different dessert experience.
- Grilled Corn on the Cob: For a savory touch, serve warm, buttery corn. Its slight char complements the sweetness, making your spread more balanced.
- Layered Berry Trifle: A luxurious addition, combining whipped cream, custard, and mixed berries, enhances the celebratory feel while echoing the red, white, and blue motif.

Red, White & Blue Cake Pops Recipe FAQs
What type of cake mix should I use for the Red, White & Blue Cake Pops?
You can use a standard white cake mix for these cake pops, but for a personal touch, consider making a homemade cake using your favorite vanilla cake recipe! The white cake mix gives them the right structure and sweetness.
How should I store Red, White & Blue Cake Pops?
Store your Red, White & Blue Cake Pops in an airtight container in the refrigerator for up to one week. This keeps them fresh and delicious while preserving their vibrant look!
Can I freeze the cake balls before coating them?
Absolutely! To freeze your cake balls, first chill them in the refrigerator for about one hour. Once firm, place them on a baking sheet and freeze for 1-2 hours until solid. Then, transfer the cake balls to a zip-lock bag where they can be stored for up to three months. When ready to serve, dip them directly in the melted candy coating without thawing!
What should I do if my candy coating is too thick?
If your candy coating appears too thick after melting, don’t worry! Just add a small amount of vegetable shortening to the melted candy melts. Stir well to achieve a smoother consistency that will coat your cake pops more easily. Make sure to heat in short bursts to avoid burning the candy.
Can I make these cake pops gluten-free?
Yes! You can use a gluten-free cake mix instead of a regular white cake mix to make these festive cake pops gluten-free. Just be sure to check the other ingredients, ensuring that candy melts and any additional decorations are also gluten-free.
Is there a substitute for Greek yogurt in the cake pops?
If you’d like to avoid Greek yogurt, you can use unsweetened applesauce as a dairy-free alternative. This will still provide the necessary moisture for your cake pops without using eggs or oil. You can also use regular plain yogurt if you prefer!
Red, White & Blue Cake Pops Made with Greek Yogurt Magic
Ingredients
Equipment
Method
- Preheat your oven to 350°F (175°C). In a large mixing bowl, combine the white cake mix, plain Greek yogurt, and water. Stir until a sticky batter forms.
- Divide the batter evenly into three bowls. Tint one with red food coloring, one with blue, and leave one uncolored. Mix until uniform.
- Pour the colored batters into prepared baking pans in layers and bake for 12-15 minutes. Cool completely in pans.
- Crumble the cooled cakes into a large mixing bowl into pieces no larger than half an inch.
- Form the crumbled cake mixture into smooth balls using 1-2 tablespoons. Insert a stick into each ball and chill for one hour.
- Melt white candy melts and shortening in a microwave-safe bowl in short intervals until smooth.
- Dip each cake ball into the melted candy coating and sprinkle immediately with red, white, and blue sprinkles.
- Let the coated cake pops cool completely on a lined tray until the coating hardens, about 30 minutes.
Leave a Reply